Tutorial on LEBAH’s module creation using JAVA PERSISTENCE API and GROOVY Scripting Language
By: Shamsul Bahrin Abd Mutalib
MY CONTACTS LIST APPLICATION
In this tutorial, you will develop a simplified Contacts List application, for the LEBAH portal, using JAVA PERSISTENCE API and Groovy scripting language.
PRE-REQUISITES
1) JAVA 1.5 or later
2) MySQL Server 5.0, or any other database (but you must know how to configure the connection!). Create the database name lebah_persistence.
OBJECTIVE
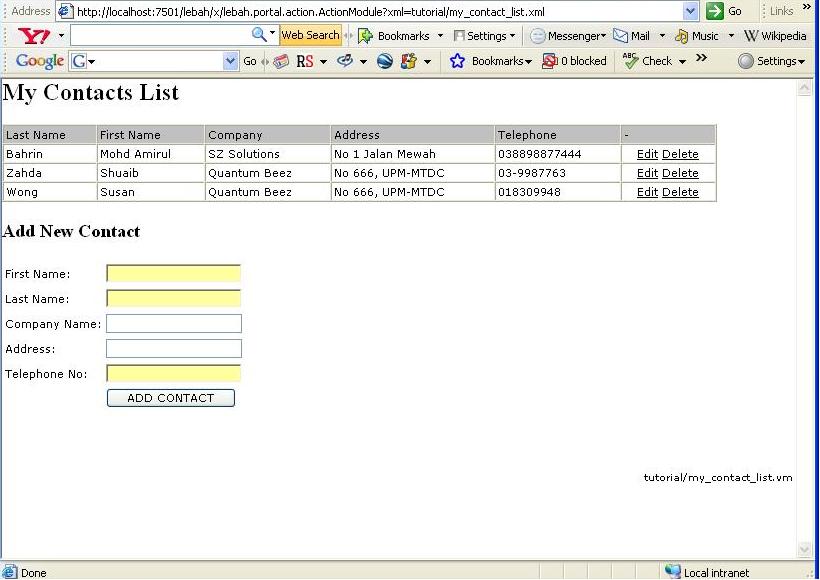
My Contacts List application will allow you to add update and delete your contact information. You will also be able to view list of all your contacts person in one single page.
JAVA PERSISTENCE API
You will be using JPA for this simple tutorial. When you have JPA in place, you don’t have to worry about database. Traditionally, in application development without JPA you will have to design the database tables with all the fields first, but with JPA this is no longer needed, but you do the model design purely through JAVA classes for the entities.
Of course, in the backend, you need a database server. The JPA will look into a special configuration file located inside the classes/META-INF folder, to get information about database to use like what is the driver to use, the usename, password and the database name. The name of this configuration file is persistence.xml. The provider for this JPA is also declared inside this file. Here’s how the persistence.xml looks like:
<persistence xmlns="http://java.sun.com/xml/ns/persistence" version="1.0">
<persistence-unit name="persistence">
<provider>the jpa provider</provider>
<class>java class name 1</class>
<class>java class name 2</class>
<properties>
information on how to connect to database
</properties>
</persistence-unit>
</persistence>
MODEL
In this simple example, you only have one entity model, a Person. To create the entity Person, the least you must have is two important annotations: @Entity and @Id
@Entity must be placed before the class declaration, and @Id must be placed before the primary key declaration.
Here we will declare an entity of name Person. The skeleton of this class will look like below;
@Entity
public class Person {
@Id
private long Id;
}
BUSINESS PROCESS
You shall codes the business process using the Groovy scripting language. LEBAH package has already have this language. The script shall handles task such as getting contacts information, adding new contacts, updating existing contacts and deleting contacts.
VIEW
The view parts are using Velocity templating engine. Information from the Groovy script shall be stored inside a velocity context object, which will be accessible inside Velocity template file. The Velocity template file will get input from the req (request) object through method getParameter(inputname).
DIRECTORY STRUCTURE
Below is the directory structure for this simple project. The stucture below must be created inside the LEBAH’s portal directory structure.
lebah-groovy-jpa-example
|
+tutorial
| contact_info.vm
| my_contact_list.vm
|
|
+WEB-INF
| |
| +classes
| |
| +META-INF
| | persistence.xml
| |
| +tutorial
| | Person.class
| |
| +actions
| | |
| | +tutorial
| | my_contact_list.xml
| |
| +groovy
| +tutorial
| AddContact.groovy
| ContactInfo.groovy
| DeleteContact.groovy
| ListContacts.groovy
| UpdateContact.groovy
|
+src
|
+tutorial
Person.java
All the Groovy scripting resides in the WEB-INF/groovy folder. Inside this folder we create a folder name tutorial to place all the files. The velocity files are placed inside the tutorial folder. The my_contact_list.xml is the configuration file for LEBAH framework to do mapping between the Groovy script with the Velocity template file.
You can download the complete source files from download section of http://www.sourceforge.net/projects/mecca-framework
MY CONTACTS LIST SOURCE CODES
THE ENTITY CLASS
We only have one entity here, the Person. Inside the src folder, create a package name tutorial, and create a JAVA class name Person. Here are the Person’s codes:
package tutorial;
import javax.persistence.*;
@Entity
public class Person {
@Id
private long id;
private String firstName;
private String lastName;
private String companyName;
private String address;
private String telephoneNo;
public Person() {
}
public long getId() {
return id;
}
public void setId(long id) {
this.id = id;
}
public String getFirstName() {
return firstName;
}
public void setFirstName(String firstName) {
this.firstName = firstName;
}
public String getLastName() {
return lastName;
}
public void setLastName(String lastName) {
this.lastName = lastName;
}
public void setCompanyName(String companyName) {
this.companyName = companyName;
}
public String getCompanyName() {
return companyName;
}
public String getTelephoneNo() {
return telephoneNo;
}
public void setTelephoneNo(String telephoneNo) {
this.telephoneNo = telephoneNo;
}
public String getAddress() {
return address;
}
public void setAddress(String address) {
this.address = address;
}
public String toString() {
return lastName + ", " + firstName;
}
}
PERSISTENCE API
The persistence.xml contains information about the JPA provider, entity classes and database connection information.
<persistence xmlns="http://java.sun.com/xml/ns/persistence" version="1.0">
<persistence-unit name="persistence">
<provider>
oracle.toplink.essentials.ejb.cmp3.EntityManagerFactoryProvider
</provider>
<class>tutorial.Person</class>
<properties>
<property name="toplink.jdbc.driver" value="com.mysql.jdbc.Driver" />
<property name="toplink.jdbc.url"
value="jdbc:mysql://localhost:3307/lebah_persistence" />
<property name="toplink.jdbc.user" value="root" />
<property name="toplink.jdbc.password" value="" />
<property name="toplink.ddl-generation" value="create-tables" />
</properties>
</persistence-unit>
</persistence>
As you can see, LEBAH is using the Oracle’s Toplink JPA provider. There is only one entity class defined, the tutorial.Person. Database server in use is MySQL and the database name is lebah_persistence, and you can see all the connection information there – driver, usename and password. There is one property name “toplink.ddl-generation” with value set to “create-tables”. This will tell the JPA provider to create tables for the entities involves if the tables are not available.
THE BUSINESS PROCESS
First when user access the application he will see a list of already available contacts.
By default, the Groovy scripts name ListContacts.groovy will be executed to get a list of all the contacts. As defined in the my_contacts_list.xml:
<command name="">
<action name="groovy/tutorial/ListContacts.groovy" />
<views>
<target name="normal" view="tutorial/my_contact_list.vm"/>
<target name="error" view="vtl/action/error.vm"/>
</views>
</command>
Here are the codes inside the script ListContacts.groovy:
ListContacts.groovy
import tutorial.Person
import lebah.db.PersistenceManager
pm = new PersistenceManager()
context.put("persons", pm.list("select p from Person p order by p.firstName"))
The list of persons are put in the context object with mapped name “persons”. This will then forward to a Velocity template file my_contact_list.vm:
my_contact_list.vm
<h2>My Contacts List</h2>
<table width="90%" cellspacing="0" cellpadding="2" border="1">
<tr bgcolor="silver"><td>Last Name</td><td>First Name</td><td>Company</td><td>Address</td><td>Telephone</td><td>-</td></tr>
#foreach( $person in $persons )
<tr>
<td>$person.lastName</td>
<td>$person.firstName</td>
<td>$person.companyName</td>
<td>$person.address</td>
<td>$person.telephoneNo</td>
<td align="center">
<a href="javascript:selectContact('$person.id')">Edit</a>
<a href="javascript:deleteContact('$person.id')">Delete</a>
</td></tr>
#end
</table>
<h3>Add New Contact</h3>
<table>
<tr><td>First Name:</td><td><input name="firstName"></td></tr>
<tr><td>Last Name:</td><td><input name="lastName"></td></tr>
<tr><td>Company Name: </td><td><input name="companyName"></td></tr>
<tr><td>Address: </td><td><input name="address"></td></tr>
<tr><td>Telephone No:</td><td><input name="telephoneNo"></td></tr>
<tr><td></td><td><input type="button" value="ADD CONTACT" onclick="addContact()"></td></tr>
</table>
Carefully inspect the codes above. You will find there are three javascript functions, which are:
1) selectContact(id) that happened when user click the EDIT on one of the contact from the list.
2) deleteContact(id) that happened when user click the DELETE on one of the contact from the list.
3) addContact() that happened when user click the ADD CONTACT button after he filled in the contact information.
As you can see, those functions has no javascript implementation, but they are only declared at the place where they are supposed to be invoked.
In the Velocity template above, there is an input form that consists of input fields as below:
First Name:
Last Name:
Company Name:
Address:
Telephone No:
User will fill in all the information above and click the ADD button that will send the command addContact. As defined in the my_contact_list.xml, the addContact command shall execute the script AddContact.groovy, which will forward to Velocity template my_contact_list.vm if there are no exception occurred.
<command name="addContact">
<action name="groovy/tutorial/AddContact.groovy" />
<views>
<target name="normal" view="tutorial/my_contact_list.vm"/>
<target name="error" view="vtl/action/error.vm"/>
</views>
</command>
AddContact.groovy
import tutorial.Person
import lebah.db.PersistenceManager
pm = new PersistenceManager()
person = new Person()
person.setId(System.currentTimeMillis())
person.setFirstName(req.getParameter("firstName"))
person.setLastName(req.getParameter("lastName"))
person.setCompanyName(req.getParameter("companyName"))
person.setAddress(req.getParameter("address"))
person.setTelephoneNo(req.getParameter("telephoneNo"))
pm.add(person)
context.put("persons", pm.list("select p from Person p order by p.firstName"))
In the codes above, the req.getParameter(fieldname) will get the value from the input field with the name specify by fieldname from the Velocity template.
After the above script finish executing, it will forward to the Velocity template my_contact_list.vm again, where the newly added contact shall be available in the list.
Let’s look again in the my_contacts_list.xml for command selectContact.
<command name="selectContact">
<param name="id" />
<action name="groovy/tutorial/ContactInfo.groovy" />
<views>
<target name="normal" view="tutorial/contact_info.vm"/>
<target name="error" view="vtl/action/error.vm"/>
</views>
</command>
The command selectContact will carry one parameter name id. In the Velocity template the parameter id is an argument for javascript function name selectContact, as shown below:
<a href="javascript:selectContact('$person.id')">Edit</a>
The argument is the id of the person, selected from the list. When user click on the Edit, it will send selectContact command with the parameter name id which has the value of the selected person id. As defined by the my_contact_list.xml, this will execute the Groovy script ContactInfo.groovy.
ContactInfo.groovy
import tutorial.Person
import lebah.db.PersistenceManager
pm = new PersistenceManager()
person = pm.find(Person.class, req.getParameter("id").toLong())
context.put("person", person)
When this script finish executing it will forward to the Velocity template contact_info.vm.
contact_info.vm
<h2>My Contact Info</h2>
<table>
<tr><td>First Name:</td><td><input name="firstName" value="$person.firstName"></td></tr>
<tr><td>Last Name:</td><td><input name="lastName" value="$person.lastName"></td></tr>
<tr><td>Company Name: </td><td><input name="companyName" value="$person.companyName"><br>
<tr><td>Address: </td><td><input name="address" value="$person.address"></td></tr>
<tr><td>Telephone No:</td><td><input name="telephoneNo" value="$person.telephoneNo"></td></tr>
<tr><td></td><td><input type="button" value="UPDATE CONTACT" onclick="updateContact('$person.id')"></td></tr>
</table>
The Velocity template above shall display all the information of the person inside an input fields where user is able to modify the values. When done, user can click the UPDATE CONTACT button, which will send the command updateContact with one parameter of person id.
This command will execute the Groovy script UpdateContact.groovy.
UpdateContact.groovy
import tutorial.Person
import lebah.db.PersistenceManager
pm = new PersistenceManager()
person = (Person) pm.find(Person.class).whereId(req.getParameter("id").toLong()).forUpdate()
person.setFirstName(req.getParameter("firstName"))
person.setLastName(req.getParameter("lastName"))
person.setCompanyName(req.getParameter("companyName"))
person.setAddress(req.getParameter("address"))
person.setTelephoneNo(req.getParameter("telephoneNo"))
pm.update()
context.put("persons", pm.list("select p from Person p order by
p.firstName"))
The UpdateContact script above, will modify the value of the person information. Then it will forward to the Velocity template my_contacts_list.vm, which will list down all the contacs information and you will see the modified data there.
For deleting a contact, user shall click on the Delete button of the contact to be deleted from the list. In the my_contact_list.xml, you can see that the deleteContact command have one parameter, the person id, where in the Velocity template there are javascript function deleteContact with the person id to be deleted as the argument,.
In my_contacts_list.xml:
<command name="deleteContact">
<param name="id" />
<action name="groovy/tutorial/DeleteContact.groovy" />
<views>
<target name="normal" view="tutorial/my_contact_list.vm"/>
<target name="error" view="vtl/action/error.vm"/>
</views>
</command>
In the Velocity template:
<a href="javascript:deleteContact('$person.id')">Delete</a>
The Groovy script for delete a person:
DeleteContact.groovy
import lebah.db.PersistenceManager
pm = new PersistenceManager()
pm.executeUpdate("delete from Person p where p.id = '" + req.getParameter("id") + "'")
context.put("persons", pm.list("select p from Person p order by
p.firstName"))
When the above code done executing, it will forward to my_contacts_list.vm, and the deleted contact is now no longer available from the list.
HOW TO RUN THE APPLICATION WITH THE LEBAH PORTAL
You must use the latest LEBAH portal release, version 1.0.2 from the download section.
Download this tutorial source files from the download section, as below:
To run, you will need to invoke the lebah.portal.action.ActionModule using the /x controller, with parameter xml that point to the location of the XML configuration file, which is xml=tutorial/my_contact_list.xml. The complete URL is:
http://localhost:7501/lebah/x/lebah.portal.action.ActionModule?xml=tutorial/my_contacts_list.xml
CONCLUSION
This tutorial is about LEBAH framework modules development using the Action-Template Model. In this model, there is an XML file as the configurator to map between the Groovy script and the Velocity Template, and the use of the JAVA PERSISTENCE API for entity persistence.